Getting Started
This document aims to get you started with using and deploying the On-Demand Fedora Build Service, an effort to make Fedora image building easier. Using this service you can make boot iso, DVD iso and live images of Fedora Linux.
The service can be used in two modes:
- Local mode
- Distributed mode
In local mode, all the work is done on the local machine, whereas in distributed mode, the build job is distributed across multiple build nodes and building images for multiple Fedora releases and architecture is supported.
Local Mode
The local mode involves minimum setup requirements and is easy to get started with. If you intend to deploy the service across multiple nodes, the local mode is a good way to smoke test the working of the service. Let’s get staretd:
- Clone the source from the git repository using
$ git clone git://github.com/amitsaha/gsoc2012_fbs.git - Install fabric using
$sudo yum install fabric - Navigate to the cloned source repository (
gsoc2012_fbs). You will see a fabric fabfile,fabfile.py(basically a symbolic link todeploy.py- the real script)
To setup everything you need for running the image building service
in local mode, excute $ fab deploy_local, which should ask for your
sudo password as it installs the packages needed for running the
image building service, installs the package, image_builder and
another setup requirement.
Now you are ready to using the image building service. Navigate to the
cli/ directory in the source tree. The file
`build_cli_basic.py` is a command line client to build a Fedora
image as per your specifications. Here is a quick overview of how to
specify a boot iso:
[DEFAULT]
type=boot
arch=x86_64
release=17
staging=10.0.0.27
#staging=file:///tmp/staging
email=amitsaha.in@gmail.com

[boot]
product=fedora
release=17
version=1
updates=0
updates-testing=0
17_url=http://download.fedoraproject.org/releases/17/Everything/x86_64/os
17_mirror=http://mirrors.fedoraproject.org/metalink?repo=fedora-17&arch=x86_64
#17-updates_url=http://download.fedoraproject.org/updates/17/i386
#17-updates_mirror=https://mirrors.fedoraproject.org/metalink?repo=updates-released-f17&arch=i386
proxy=
nvr=package1;packag2;
bid=package3;packag4
outdir=/tmp/lorax_op
workdir=/tmp/lorax_work
The [DEFAULT] section of the configuration contains the following
information:
type- Type of image to be built, has to be one of
boot, dvd, live arch- Architecture of the image. Note that, if you are on a
i686node, you will only be able to build an image of that type. Valid values arei686, x86_64 release- The Fedora release of the image to be built. It should be the same as the release of fedora you are running, else unexpected things may happen.
staging- This is where your built images will be stored once
completed. There are two options: local file system (specified via
`file:///foo/bar`) or a FTP server with anonymous access specified via the IP address of the server email- An email address for image building notification. This isn’t active
in local mode (although you can activate it using a simple change
to the client code,
build_cli_basic.py`, which we learn more about a little later).
The [boot] section specifies the options which are specific to
lorax, Fedora’s image creation tool. The product option specifies
the name of the Boot ISO being created, usually fedora. The
release option is the same as above. The version name
specifies the version of the ISO being built.
The next few options describe the repository and mirrorlists.
The updates and updates-testing repository can be
enabled/disabled by setting them to 1 or 0,
respectively. The release repository and mirror is specified via the
options {release}_url and {release}_mirror (where release
is the above specified value). If you have enabled any or both of
updates or updates-testing, you have to specify the repository
and mirror list for them as well. Incase you have a proxy setup
for your repositories, specify it here (untested).
Incase you want to include packages which are not yet there in any of
the repositories, you may specify them via their NVR strings or
Koji build IDs using the next two options: nvr and bid. If you don’t have any
such requirements, just leave them blank. The packages will be pulled
in from Koji and included in your image.
Finally, lorax requires an output directory where it places the
image it builds. You can specify it using outdir. The workdir
option is used to specify a directory which will be used by the image
building code to download the extra packages and create a side
repository (if any).
Now, you may save the above specification in a file called,
boot_imagebuild.conf. Next, execute the build_cli_basic.py
script using $sudo python build_cli_basic.py
/location/for/boot_imagebuild.conf, which should trigger the build
process:
Initiating Build Process. See /tmp/imagebuild_13446647457.log for progress
checking for root privileges
checking yum base object
setting up build architecture
setting up build parameters
installing runtime packages
..
If you check the specified log file, you should see messages like:
2012-08-11 16:07:58,798 - Registered a new Image Build request from amitsaha.in@gmail.com
2012-08-11 16:07:58,798 - Image type:: boot
2012-08-11 16:07:58,800 - Starting the Image Build Process
2012-08-11 16:07:58,800 - Creating side repository
2012-08-11 16:07:58,803 - Downloading packages for Side repository
2012-08-11 16:08:17,350 - Side repository created
2012-08-11 16:08:17,353 - All set. Spawning boot iso creation using lorax.
2012-08-11 16:28:39,101 - Boot ISO built succesfully
2012-08-11 16:28:39,118 - Image building process complete
2012-08-11 16:28:39,118 - Image successfully created. Transferring to staging.
2012-08-11 16:28:39,118 - Initiating local transfer of image(s) to /tmp/staging
2012-08-11 16:28:43,238 - Initiating local transfer of logs to /tmp/staging
2012-08-11 16:28:43,895 - Image(s) and logs available at file:///tmp/staging
The boot_imagebuild.conf file that was used had the following
contents:
[DEFAULT]
type=boot
arch=x86_64
release=17
#staging=10.0.0.27
staging=file:///tmp/staging
email=amitsaha.in@gmail.com
[boot]
product=fedora
release=17
version=17
updates=0
updates-testing=0
17_url=http://download.fedoraproject.org/releases/17/Everything/x86_64/os
17_mirror=http://mirrors.fedoraproject.org/metalink?repo=fedora-17&arch=x86_64
#17-updates_url=http://download.fedoraproject.org/updates/17/i386
#17-updates_mirror=https://mirrors.fedoraproject.org/metalink?repo=updates-released-f17&arch=i386
proxy=
nvr=wget-1.13.4-4.fc17
bid=
outdir=/tmp/lorax_op
workdir=/tmp/lorax_work
If you compare the logging messages and the image build specification, you will see that I have specified an extra package to be pulled in from Koji using a NVR string and hence the messages regarding side-repository creation.
Similarly, you can also build DVD and Live images using this
command line client and the appropriate specifications. For sample
specification for these, see the conf/ directory in the checked
out sources.
It should be kept in mind that all the options must be specified in the configuration files as in the samples given. It is therefore recommended that you use one of the sample configuration files to build your own. A simple configuration file generator will soon be made available.
Distributed Mode
The distributed mode enables deployment of the code on multiple nodes and dare we say, in production. The advantages of this mode include support for building images for different Fedora releases and architecture. Also, your local machine will not be hogged with building images. Let’s see how we can deploy the build service in this mode.
Deployment Configuration
First, the deployment configuration is specified via the file
conf/deploy.conf:
[broker]
i686="amqp://guest@10.0.0.30//"
x86_64="amqp://guest@10.0.0.27//"

[releases]
releases=17,rawhide

[master]
host=gene@localhost
workdir=/tmp/imagebuilder_webapp

[workers-17]
i686=root@10.0.0.30
x86_64=root@10.0.0.27
workdir=/tmp/imagebuilder_worker

[workers-rawhide]
i686=root@10.0.0.37
x86_64=root@10.0.0.43
workdir=/tmp/imagebuilder_worker

[SMTP]
#replace these with appropriate credentials
#single quotes needed
server='smtp.gmail.com'
port='587'
login='bot@gmail.com'
password='f00bar'
Let us understand this configuration file’s sections and options.
broker- The
urlof the message broker is specified here. This is used by Celery, which is used to distribute the build jobs. As you can see, RabbitMQ is used as a broker in this case. Currently, two brokers are used: one for thei686build nodes and another forx86_64build nodes. The assumption is that these URLs will point to one of the appropriate worker nodes specified later. For example, thei686broker URL should point to ai686worker node and similarly for thex86_64URL. releases- Specify the supported releases here.
master- This section specifies the
user@hoststring (in thehostoption) of the node which will be the master node of the build service. This node will host the Web application that users of this service will use to submit build requests. SSH server should be running on this server to enable deployment and firewall rules appropriately set to allow incoming connections on port 5000. Theworkdiroption specifies the directory where the web application will be hosted from.
Next, the build node configurations are specified. Depending on the
number of supported releases, there will be one or more sections - one
for each supported release, with section names of the form
worker-{release}, where release is one of the values
specified in releases above.
worker-{release}- This section should specify the
root@hoststrings for workers supportingi686andx86_64image building using the appropriate options. Each worker section should have both specified. Multipleuser@hoststrings should be seperated via a ; (semicolon). Theworkdiroption specifies the directory where the deployment of the build service will take place from. SMTP- This section specifies the SMTP server configuration which will be used for sending notification emails to the job requester.
Deployment using Fabric
Once this configuration file is ready, the fabric script
fabfile.py will be used to deploy the service. Let us see the
tasks that are currently available in the script (assuming you are in
the source root):
$ fab --list

This is a fabfile (http://docs.fabfile.org/en/1.4.2/index.html)
to deploy On-Demand Fedora Build Service.
See doc/ for usage guidelines.

Available commands:

    copy_files_webapp         Copy files to the web application host
    copy_files_workers        Copy the files to the workers
    deploy_local              Deployment in local mode
    deploy_webapp             Deploy the web application (and enable REST API)
    deploy_workers            Deploy the workers
    install_packages_webapp   Install dependencies for the web application
    install_packages_workers  Install dependencies on the workers
    setup_cli                 Deployment for using the command line client in distributed mode
Deploying the Workers
First, let us deploy the workers. We shall first copy the appropriate
files to the worker, install the necessary packages and then finally
start the worker processes (root access to all the workers is
required). We run the corresponding taks via fabric:
$ fab copy_files_workers install_packages_workers deploy_workers
[root@10.0.0.37] Executing task 'copy_files_workers'
[root@10.0.0.37] run: rm -rf /tmp/imagebuilder_worker
[root@10.0.0.37] Login password for 'root':
..
..
It will take a while before all the taks are completed and provided
there are no errors, your workers should now be up and ready to
build. Assuming that the above deployment completed without any
errors, you can do a simple check to verify whether the workers are up
and running using flower (a web-based tool for monitoring
celery workers.). In your browser, open the URL http://<ip>:8008,
where <ip> can be any of the worker node IPs. If the IP address
you chose is one of the i686 nodes’ IPs, then you should see a
webpage showing all the i686 nodes you specified. For example,
the following screenshot shows a sample flower interface:
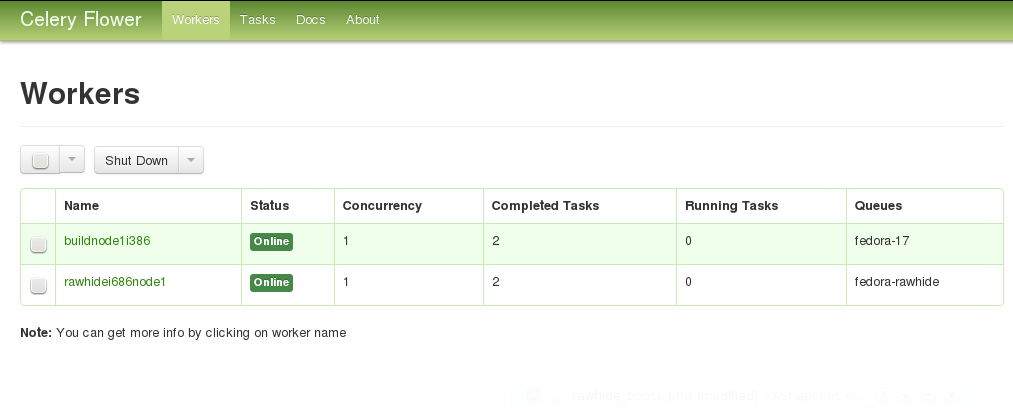
If you do not see all of the nodes you specified for the specified architecture, something is wrong, and should be investigated.
Now that the workers are deployed, let us now explore the options currently available for submitting an image build task.
Command line
A command line client, build_cli.py is available in the cli/ directory of the
source tree. Its usage is same as the command line client in local
mode, build_cli_basic.py. However, before you can start using the
command line client you you will need to setup your client computer
using the fabric script we used earlier.
From the source tree root, execute $ fab setup_cli. You will
notice that it installs a few dependencies and also writes a file,
cli/nodes.conf. This file contains the information regarding the
message brokers we discussed earlier. The client will use the message
brokers to communicate with the workers. Once this has been completed,
you can now submit a new build request:
python build_cli.py ../conf/boot_imagebuild.conf
Sending build task to worker
If all goes well, you should get an email at the email address you specified in the config file of the form:
Your Image Building Request have been submitted. You may monitor
the progress by going  to http://10.0.0.27:5100/log/tmp/imagebuild_134473790944.log.
You will also recieve an email upon completion.
As you can see, the build job is being carried out by a worker node
with the IP address: 10.0.0.27. And you can monitor the progress
by clicking that link. Once the job has completed, you should get an
email saying that your job has been completed and the log messages. If
you specified a FTP server to copy the images to, the image should be
available there with a timestamp suffixed to the filename. If there
was an error in your image build task, the email will tell you the
same.
Note:
As of now, there seems to be an yet unsquished bug which sometimes
prevents you from seeing the log files. This has something to do
with ``Celery's`` logging and the image builder's logging. In that
case, the best bet is to just wait till you get a job completion
email and check your staging area for the image(s)/logs.
Its important that you specify a anonymous writable FTP server as your staging area here, since otherwise you will have to get the image/logs by logging into the worker node.
It is to be noted that you can use this client from any computer which can access the worker nodes.
Web and REST API interface
You can also submit your image building jobs via the web application. Let’s see how you can set this up. Deploying the web application will involve three steps: copy the files to the web application host computer, install the packages and then finally start the web application. Once again, we use the fabric script to carry these steps:
$ fab copy_files_webapp install_packages_webapp deploy_webapp
[gene@localhost] Executing task 'copy_files_webapp'
[gene@localhost] run: sudo rm -rf /tmp/imagebuilder_webapp
[gene@localhost] Login password for 'gene':
[gene@localhost] out: [sudo] password for gene:

[gene@localhost] run: mkdir -p /tmp/imagebuilder_webapp
[gene@localhost] put: /home/gene/work/gsoc2012_fbs/setup.py -> /tmp/imagebuilder_webapp/setup.py
..
Once these steps have been completed successfully without errors, you
can now point your browser to <master>:5000/, where
<master>> is the IP address of your web application host as
specified in the deploy.conf file.
Once you are there, you should see the following interface.
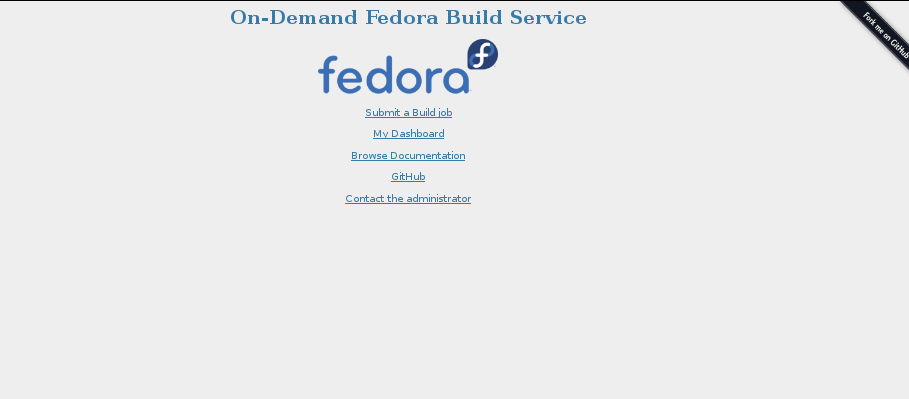
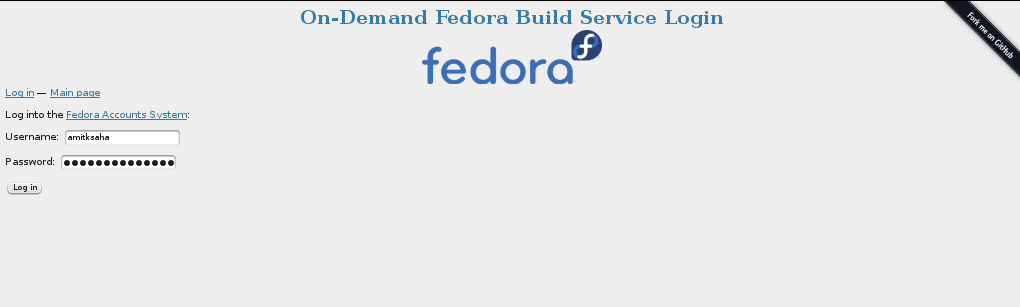
The first link allows you to submit a new image build job. Note that it requires you to have a Fedora Account System (FAS) login. So, if you don’t have one, please create one.
Login
Web-based Build Interface
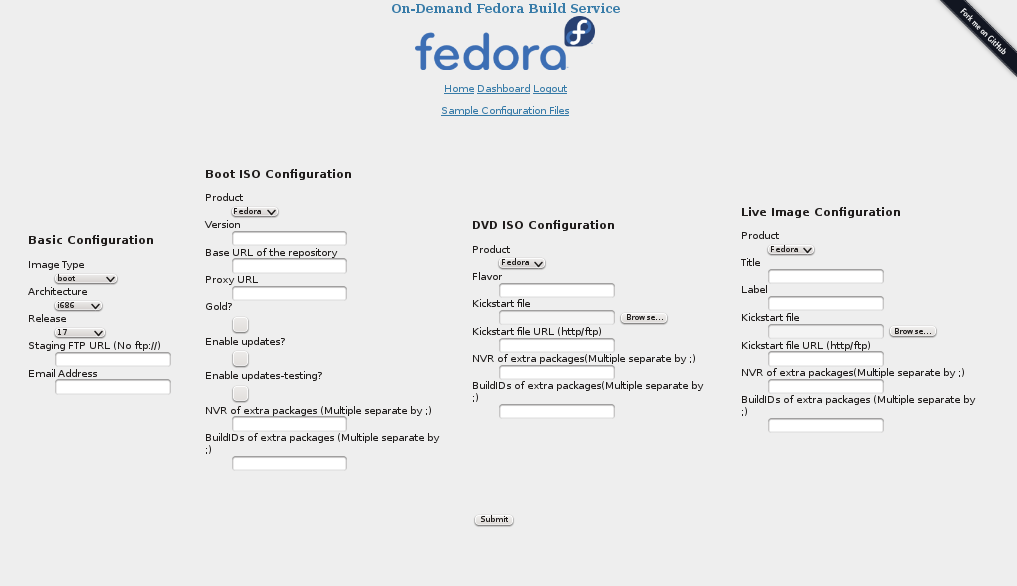
The options on the Web UI are similar to what you specified in the
configuration files earlier. You choose the type of
image, the architecture, staging, release, etc. Once you hit Submit,
you should get an email notification similar to the previous
section. If you get an email saying Try again.., please do so.
The Dashboard page which is currently not implemented will have your details of your past and present build jobs submitted.
The web application also exposes a REST API endpoint
<master>:5000/rest which can be then accessed via a REST client to
send build requests. An example client is cli/build_rest.py which
is to be invoked similar to the other command line clients,
i.e. python build_rest.py <config file>.
- Please note::
- The REST API is currently insecure, i.e. there is not integration
with FAS. If you consider this a security risk, do not expose
this. Simply disable it in the web application,
webapp/app.py.
Both the web interface and the REST API has the advantage that they allow submitting build requests from any other device having access to the network without any of dependencies required to be installed for the command line client in the previous section.